QR Code Print Size & Resolution Guide: DPI, Dimensions and Best Practices
Master QR code print size, resolution, and DPI calculations. Learn minimum dimensions, quiet zone rules, error correction trade-offs, and prepress testing.
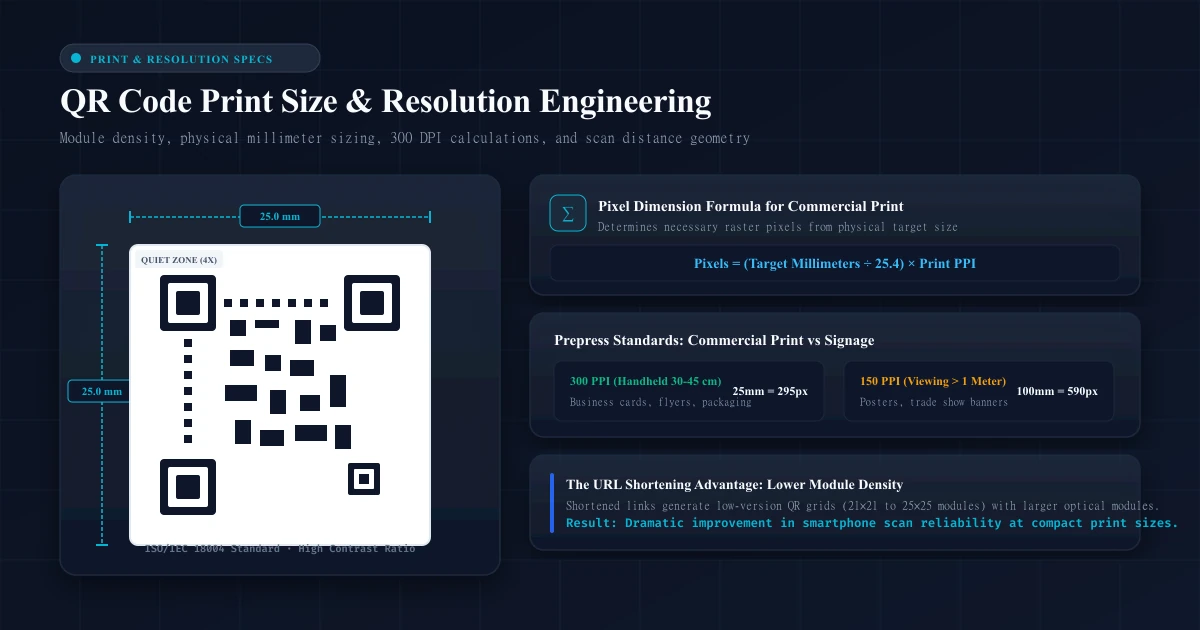
QR Code Print Size & Resolution Guide: DPI, Dimensions and Best Practices
Printing a QR code seems straightforward until the printed material arrives from the commercial print shop and customers cannot scan it. Whether you are printing business cards, product packaging, event banners, or restaurant menus, QR codes operate under strict optical physics and digital imaging constraints. A code that scans instantly on a backlit 4K monitor can completely fail when rendered on matte cardstock or viewed under fluorescent supermarket lighting.
Ensuring your QR code prints cleanly and scans reliably across hundreds of smartphone models requires understanding the interplay between physical print dimensions, raster pixel resolution (DPI/PPI), QR code module density, scanning distance, and print media substrates.
This comprehensive guide breaks down the engineering behind QR code print sizing, provides exact mathematical formulas for commercial prepress calculations, details the trade-offs of error correction levels and vector formats, and provides a field-tested print checklist.
What Determines QR Code Print Quality?
When a smartphone camera points at a printed QR code, its optical sensor does not see "a website link." The sensor captures an analog light pattern reflecting off a physical surface, converts it into an image array, and runs edge-detection algorithms to locate three distinct corner markers called Position Detection Patterns (finder patterns). Once located, the decoder measures the grid, samples each individual square module as a binary bit (black or white), runs Reed-Solomon error correction routines, and extracts the encoded byte payload.
For this multi-step optical process to succeed in real-world environments, several variables must align:
- Optical Module Resolution: Every QR code is composed of an array of square dots called modules. If an individual module is printed too small for the camera sensor's lens and autofocus system to resolve at a comfortable viewing distance, the decoder cannot distinguish adjacent bits.
- Edge Sharpness & Raster Fidelity: In commercial printing, blurry edges caused by low-resolution raster files (such as an upscaled 72 DPI image) bleed black ink into white spaces, corrupting the timing patterns.
- Contrast Ratio: Decoders require strong luminance contrast between dark modules and light backgrounds. Glossy papers, metallic inks, or low-contrast brand palettes reduce readability.
- Substrate Curvature and Distortion: Printing on cylindrical objects (beverage cans, bottles) or flexible pouches curves the grid lines, requiring higher print tolerances or specialized placement.
- Payload Density: Encoding a 200-character URL creates a dense matrix with hundreds of tiny modules. Encoding a short 25-character URL creates a sparse matrix with large, easily readable modules.
How QR Code Size and Resolution Work
A QR code is not a static graphic; it is a matrix whose grid size expands dynamically based on the amount of data encoded and the chosen level of error correction.
QR Code Versions and Module Counts
The ISO/IEC 18004 standard defines 40 discrete QR code "Versions," ranging from Version 1 up to Version 40:
- Version 1: 21 × 21 modules
- Version 2: 25 × 25 modules
- Version 3: 29 × 29 modules
- Version 4: 33 × 33 modules
- Version 10: 57 × 57 modules
- Version 40: 177 × 177 modules
Each increment in version adds 4 modules per side (Modules = 4 × Version + 17).
Version 1 (21 × 21 modules)          Version 6 (41 × 41 modules)
┌──────────────┐                     ┌────────────────────────┐
│  █▀▀█   █▀▀█ │                     │  █▀▀█ ▄▄▄▄  ▄ █▀▀█     │
│  █▄▄█   █▄▄█ │                     │  █▄▄█ █ █ █ ▄ █▄▄█     │
│  ▄▄▄▄   ▄▄▄▄ │                     │  ▄▄▄▄ █ █ █ █ ▄▄▄▄     │
│  █▀▀█   ▄▄▄▄ │                     │  █ █▀ ▄▄▄ █ █ █ █▀     │
└──────────────┘                     └────────────────────────┘
Sparse grid = Large modules          Dense grid = Tiny modules
Forgiving print tolerances           Demands high resolution & large size
At any given physical print dimension (for example, 25 mm × 25 mm), a Version 1 code allocates 25 mm / 21 ≈ 1.19 mm per module. A Version 6 code occupying that identical 25 mm space allocates only 25 mm / 41 ≈ 0.61 mm per module. The Version 6 modules are nearly half the size, requiring significantly higher print resolution and demanding that the user hold their phone much closer to achieve focus.
What Is the Minimum QR Code Size for Printing?
One of the most common questions designers ask is: "What is the absolute minimum QR code size for print?"
The technical answer is that there is no universal minimum print dimension, because scan success depends on the camera's sensor resolution, focal length, symbol version, and lighting. However, empirical print industry testing and smartphone hardware constraints establish reliable practical baselines:
- Absolute Practical Minimum: 20 mm × 20 mm (approx. 0.8 in × 0.8 in) for standard handheld items (business cards, product labels).
- Conservative Commercial Minimum: 25 mm × 25 mm (approx. 1.0 in × 1.0 in) to guarantee rapid scanning across entry-level Android devices and older iPhone cameras without autofocus hunting.
- Controlled Prepress Exception: In exceptional cases with high-precision offset printing, clean white substrates, low-density Version 1 symbols, and high contrast, codes as small as 15 mm × 15 mm (0.6 in × 0.6 in) can scan. However, this leaves zero safety margin for lens smudges, motion blur, or sub-optimal lighting.
Cautionary Principle: Sizing recommendations are starting baselines, not guarantees. A 20 mm code holding a 25-character short URL will scan reliably, whereas a 20 mm code holding a 180-character raw tracking link will frequently fail.
QR Code Size Recommendations by Use Case
Different print collateral serves different scanning distances. A consumer holding a business card scans from 25–35 cm away, while a commuter scanning a subway poster stands 1.5 to 2.5 meters back.
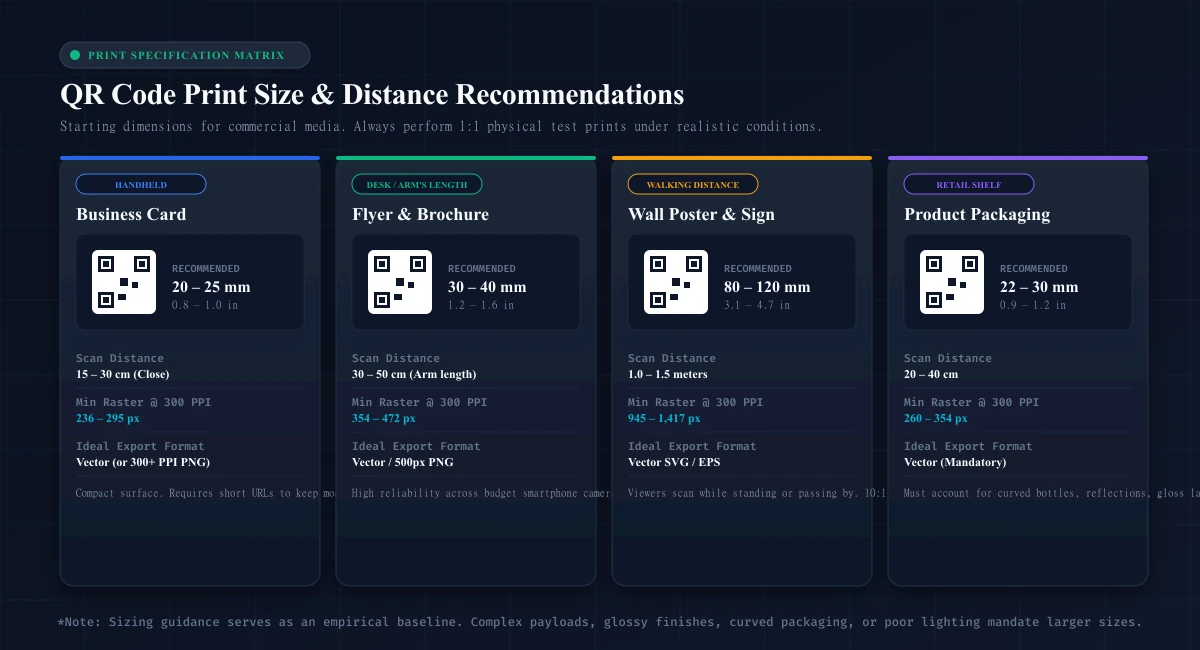
The following reference table provides recommended starting dimensions, scanning distances, and prepress raster guidelines across common print applications:
| Application | Typical Scan Distance | Recommended Physical Size | Equivalent Inches | Min Raster Pixels (@ 300 PPI) | Recommended Symbol Density |
|---|---|---|---|---|---|
| Business Card | 20 – 35 cm (8 – 14 in) | 20 – 25 mm | 0.8 – 1.0 in | 236 – 295 px | Version 1 – 2 (Short URL) |
| Flyer / Postcard | 30 – 50 cm (12 – 20 in) | 30 – 40 mm | 1.2 – 1.6 in | 354 – 472 px | Version 1 – 3 |
| Brochure / Catalog | 30 – 45 cm (12 – 18 in) | 25 – 35 mm | 1.0 – 1.4 in | 295 – 413 px | Version 1 – 3 |
| Table Tent / Menu | 35 – 60 cm (14 – 24 in) | 35 – 50 mm | 1.4 – 2.0 in | 413 – 590 px | Version 1 – 4 |
| Window Signage | 1.0 – 1.5 m (3.3 – 5.0 ft) | 80 – 120 mm | 3.1 – 4.7 in | 945 – 1,417 px | Version 1 – 4 |
| Wall Poster (A2/A1) | 1.5 – 2.5 m (5.0 – 8.2 ft) | 120 – 180 mm | 4.7 – 7.1 in | 1,417 – 2,126 px | Version 1 – 4 |
| Trade Show Banner | 2.0 – 3.5 m (6.5 – 11.5 ft) | 200 – 350 mm | 7.9 – 13.8 in | 1,181 – 2,067 px (@ 150 PPI) | Version 1 – 4 |
| Product Packaging | 25 – 40 cm (10 – 16 in) | 22 – 30 mm | 0.9 – 1.2 in | 260 – 354 px | Version 1 – 2 (Short URL) |
The 10:1 Distance-to-Size Ratio Rule of Thumb
In print and outdoor advertising, a widely adopted optical baseline is the 10:1 scanning ratio:
$$\text{Scanning Distance} \approx 10 \times \text{QR Code Width}$$
Or rearranged to solve for code size:
$$\text{Recommended QR Code Width} \approx \frac{\text{Anticipated Scanning Distance}}{10}$$
Example: If you anticipate that people will scan your poster from a distance of 1.5 meters (150 cm), your QR code should have a physical width of approximately 15 cm (150 mm).
Caveat: This ratio assumes clean atmospheric visibility and an average smartphone camera lens. For high-density QR codes (Version 6+), a more conservative 8:1 or 7:1 ratio is required to ensure the camera's sensor has sufficient optical resolution to parse individual modules.
DPI vs PPI: What Designers Need to Know
In graphic design discussions, "DPI" (dots per inch) and "PPI" (pixels per inch) are frequently conflated. Distinguishing them prevents costly prepress errors:
- PPI (Pixels Per Inch): Refers to digital image resolution—the number of discrete color pixels an image file contains per linear inch of canvas space.
- DPI (Dots Per Inch): Refers to printer hardware resolution—the physical micro-droplets of ink or laser toner dots that an imagesetter or digital press deposits onto paper to form halftones.
Commercial offset presses and digital Indigo presses generally require raster artwork to be supplied at 300 PPI. When sent to the RIP (Raster Image Processor), a 300 PPI file is converted into high-frequency screening (e.g., 2400 DPI or 150 LPI line screens).
If you place a 72 PPI image into Adobe InDesign or Illustrator and export a commercial print PDF, the printer will reproduce pixelated, stair-stepped module edges that scatter scanning laser reflections and confuse digital edge detectors.
How to Calculate Pixel Dimensions for Print
When generating or exporting a raster QR code (such as a PNG), you must calculate the exact pixel dimensions required so the graphic remains at 300 PPI when placed at its target physical dimensions.
The Conversion Formula
To calculate the required raster pixel dimensions from metric millimeters:
$$\text{Pixels} = \left(\frac{\text{Millimeters}}{25.4}\right) \times \text{PPI}$$
Where 25.4 is the exact number of millimeters in one international inch.
For imperial measurements:
$$\text{Pixels} = \text{Inches} \times \text{PPI}$$
Worked Practical Examples
Example 1: Business Card QR Code (25 mm at 300 PPI)
You want to print a 25 mm QR code on a corporate business card at standard 300 PPI commercial print resolution.
- Convert millimeters to inches:
$$25 \div 25.4 = 0.98425\text{ inches}$$
- Multiply by target PPI:
$$0.98425 \times 300 = 295.27\text{ pixels}$$
- Required export: Your raster PNG must be at least 296 × 296 pixels.
Example 2: Event Flyer QR Code (40 mm at 300 PPI)
You want to place a 40 mm QR code on an A5 event postcard.
- Convert millimeters to inches:
$$40 \div 25.4 = 1.5748\text{ inches}$$
- Multiply by 300 PPI:
$$1.5748 \times 300 = 472.44\text{ pixels}$$
- Required export: Your raster PNG must be at least 473 × 473 pixels (a 500 × 500 px export provides ideal safety overhead).
Example 3: Retail Wall Poster (100 mm at 300 PPI)
You are producing a 100 mm (10 cm) QR code on a shop window display.
- Convert millimeters to inches:
$$100 \div 25.4 = 3.937\text{ inches}$$
- Multiply by 300 PPI:
$$3.937 \times 300 = 1,181.1\text{ pixels}$$
- Required export: Your raster PNG must be at least 1,182 × 1,182 pixels.
Important Prepress Reality: This mathematical formula calculates raster pixel density to prevent printing blur; it does not guarantee that a specific code will scan. Scan viability depends on optical module size, sensor focal distance, contrast, and payload complexity.
SVG vs PNG: Choosing the Right Format
When producing QR codes for print workflows, format selection directly dictates output fidelity:
┌──────────────────────────────────────┬──────────────────────────────────────┐
│ Vector Formats (SVG, EPS, PDF)       │ Raster Formats (PNG, WebP)           │
├──────────────────────────────────────┼──────────────────────────────────────┤
│ • Infinitely scalable                │ • Fixed pixel dimensions             │
│ • Zero resolution loss               │ • Blurs or pixelates when enlarged   │
│ • Clean mathematical line edges      │ • Must be pre-calculated for PPI     │
│ • Industry standard for prepress     │ • Excellent for web and standard size│
└──────────────────────────────────────┴──────────────────────────────────────┘
Why Vector (SVG) Is the Print Industry Gold Standard
Vector formats define the QR code as mathematical coordinates (<path> or <rect> elements) rather than a grid of colored pixels. When an SVG is placed into vector layout software (InDesign, Illustrator, CorelDRAW) and scaled to 2 meters for a billboard, the RIP renders every module at the press's maximum physical output resolution (often 2400+ DPI). The edges remain razor-sharp with zero antialiasing blur.
Working with Raster (PNG) Exports
PNG is an uncompressed, lossless raster format. Unlike lossy JPEG—which creates compression artifacts and ringing halos around high-contrast edges—PNG preserves crisp boundaries between black and white pixels.
If using PNG for commercial print:
- Ensure the image pixel dimension meets or exceeds your calculated
(mm / 25.4) × 300requirement. - Never upscale a small PNG in layout software. Scaling a 200 × 200 px PNG up to 600 px causes the layout engine to interpolate pixels, producing muddy gray borders that confuse optical edge detectors.
- The free URLShortPilot QR Code Generator generates crisp PNG downloads at 200 × 200 px, 300 × 300 px, and 500 × 500 px (Print High-Res). A 500 × 500 px PNG is natively suitable for print sizes up to approximately 42 mm (1.65 inches) at full 300 PPI commercial print quality.
Quiet Zones, Contrast and Error Correction
Even if a QR code is sized appropriately and printed at high resolution, failures occur if the layout violates core scanning geometry rules.
1. The Quiet Zone (Margin)
The Quiet Zone is the clear, unprinted border surrounding all four sides of the QR symbol. According to the ISO/IEC 18004 standard, the quiet zone must have a width of at least 4 modules (4X):
$$\text{Quiet Zone Width} \ge 4 \times \text{Individual Module Width}$$
◄── 4X ──► ┌────────────────────────┐ ◄── 4X ──►
            │  █▀▀█   █▀▀█   ▄▄▄▄    │
            │  █▄▄█   █▄▄█   █ █ █   │
            │  ▄▄▄▄   ▄▄▄▄   █ █ █   │
            │  █▀▀█   ▄▄▄▄   █ █▀    │
            └────────────────────────┘
Without this 4-module buffer of blank space:
- Camera decoders cannot isolate the corner finder patterns from surrounding typography, borders, background imagery, or paper edges.
- "Creative" designs that place text directly against the QR code edge routinely fail in the field.
2. High Contrast and Polarization
Camera sensors rely on clear luminance differentials to binarize the image into 1s and 0s:
- Dark on Light (Standard): Black or very dark modules on a clean white or light background provide near 100% contrast ratio.
- Avoid Color Inversion: While the QR specification technically allows inverted codes (light modules on dark backgrounds), native iOS and Android default camera apps frequently fail to recognize inverted symbols without third-party utility apps.
- Avoid Low-Contrast Pastels: Light gray, yellow, or pale blue modules on white paper have insufficient luminance separation, especially under dim indoor lighting.
3. The Error Correction Paradox: Why Higher Isn't Always Better
QR codes utilize Reed-Solomon error correction, which embeds mathematical redundancy to allow the code to be decoded even if a portion of the symbol is obscured, dirty, or damaged.
The standard defines four Error Correction levels:
- Level L (Low): Recovers up to 7% damaged codewords.
- Level M (Medium): Recovers up to 15% damaged codewords (standard default).
- Level Q (Quartile): Recovers up to 25% damaged codewords.
- Level H (High): Recovers up to 30% damaged codewords.
┌────────────────────────────────────────────────────────────────────────┐
│                   THE ERROR CORRECTION TRADE-OFF                      │
│                                                                        │
│  Higher Error Correction  ──►  More Redundant Codewords               │
│                            ──►  Higher QR Code Version (Denser Matrix) │
│                            ──►  Smaller Physical Module Size          │
│                            ──►  Harder for Cameras to Resolve at Print!│
└────────────────────────────────────────────────────────────────────────┘
Many designers mistakenly believe that setting error correction to Level H (30%) makes their QR code "more scannable." In reality, higher error correction increases symbol density.
If you encode a link at Level H within a fixed 25 mm footprint, the matrix might jump from Version 2 (25×25) to Version 4 (33×33). Because the modules become smaller, the code becomes substantially more difficult for a smartphone camera to resolve.
Best Practice:
- For clean print materials where the code will not suffer physical damage (business cards, flyers, magazines), use Level L (7%) or Level M (15%). This keeps modules as large as possible.
- Reserve Level Q or Level H strictly for outdoor environments subject to weather/graffiti, industrial floor tags, or designs where a custom logo is intentionally superimposed over the center of the code.
Payload Optimization: Why Link Shortening Matters for Print
The single most effective way to improve QR code scan reliability at small print sizes is to reduce payload length.
Every character encoded in a QR code consumes data bits. Long URLs with extensive UTM tracking parameters, session identifiers, and deep paths inflate the QR code version:
- Raw Destination URL (128 characters):
https://example.com/products/summer-sale?utmsource=direct-mail&utmmedium=postcard&utmcampaign=q3promo&utm_content=discount20
Requires: Version 7 (45 × 45 modules) at Level M.
- Shortened Branded URL (26 characters):
https://brand.to/summer26
Requires: Version 2 (25 × 25 modules) at Level M.
Raw URL (128 chars): 45 × 45 Grid       Shortened URL (26 chars): 25 × 25 Grid
  (2,025 modules to resolve)               (625 modules to resolve)
  Module size at 25mm: 0.55 mm             Module size at 25mm: 1.00 mm
  Camera must resolve tiny dots            Modules are nearly 2× LARGER!
By using a modern URL shortening tool like URLShortPilot or connecting your own custom branded short domain, you reduce the character count to the bare minimum.
At a standard 25 mm print size, shrinking a 45×45 grid down to a 25×25 grid makes each physical module almost twice as large. This dramatically improves camera autofocus lock-on, scan speed, and low-light tolerance.
Furthermore, printing a shortened link makes your campaign dynamic. If your landing page changes, you can update the destination URL in URLShortPilot without reprinting thousands of business cards or brochures. For deep architecture insights into how redirects function under the hood, explore our technical guide on how URL shorteners work.
QR Codes for Business Cards, Flyers, Posters and Packaging
Different substrates introduce physical quirks that must be accommodated during prepress:
1. Business Cards
- Target Size: 20 mm to 25 mm.
- Challenges: Space is limited. Designers often attempt to shrink codes below 15 mm to fit sidebars.
- Solution: Shorten the URL to keep the code at Version 1 or 2. Ensure a full 4X quiet zone even when tucked into a corner. Choose a matte or uncoated cardstock rather than heavy high-gloss UV coatings that reflect overhead lighting.
2. Flyers & Postcards
- Target Size: 30 mm to 40 mm.
- Challenges: Handheld viewing in varied indoor environments.
- Solution: A 30–40 mm size provides instant scan lock. If distributing door-to-door or in direct mail campaigns, test under natural daylight and warm household lighting.
3. Posters & Signage
- Target Size: 100 mm to 200 mm (depending on foot-traffic proximity).
- Challenges: Users scan while walking or standing 1 to 2 meters away.
- Solution: Follow the 10:1 distance rule. Place the QR code at eye or chest height (approximately 1.2 to 1.5 meters from the floor). Never place QR codes near the bottom edge of a poster where users must crouch to scan.
4. Product Packaging & Cylindrical Surfaces
- Target Size: 25 mm to 35 mm.
- Challenges: Curved cans, flexible polybags, and metallic foils distort lines.
- Solution: Avoid wrapping QR codes around tight cylindrical curves (e.g., small bottles). The optical curvature compresses outer modules away from the camera, distorting the square matrix into an arc. Print the QR code parallel to the cylinder's vertical axis, or place it on a flat label section. On clear bottles or foil pouches, lay down a solid opaque white ink underprint to maintain contrast.
Common QR Code Printing Mistakes
Avoid these frequent production pitfalls before sending jobs to the press:
- Missing Quiet Zone: Bleeding background colors, illustrations, or border frames directly up to the edge of the QR code. Always maintain at least 4 modules of white space on all four sides.
- Upscaling Low-Resolution Bitmaps: Exporting a 150 px web icon and scaling it to 35 mm in print layout software. This results in soft, blurry module edges.
- Using Lossy JPEG: Compressing QR codes as JPEGs introduces ringing artifacts and pixel discolouration around high-contrast edges. Always export as lossless PNG or vector SVG.
- Color Inversion (Light on Dark): Printing white QR modules on a dark background. While some dedicated scanner apps support this, native iOS and Android camera apps frequently reject inverted codes.
- Insufficient Luminance Contrast: Using brand colors like yellow on white or navy on black. Always test the contrast ratio using grayscale conversion; if the pattern disappears in monochrome, optical sensors will struggle.
- Gloss Glare and Reflections: Applying high-gloss laminate or spot UV varnish directly over a QR code. Direct point-source lights (such as retail spotlights) create blinding specular reflections that obliterate finder patterns.
- Overloaded Payload: Encoding lengthy URLs without shortening, forcing the QR code into a dense Version 10+ grid that cannot be printed reliably at compact dimensions.
How to Test a QR Code Before Printing
Never commit to a commercial print run based solely on how a QR code looks on a computer monitor. Follow this verification protocol:
┌────────────────────────────────────────────────────────────────────────┐
│                   PREPRESS VERIFICATION PROTOCOL                       │
│                                                                        │
│ 1. 1:1 Proof Print ──► Print on office laser/inkjet at exact 100% scale│
│ 2. Lighting Audit  ──► Test in dim light, bright sun, and angled glare │
│ 3. Device Matrix   ──► Test on modern iPhone, budget Android, older cam│
│ 4. Distance Sweep  ──► Verify scan from minimum to maximum distances   │
└────────────────────────────────────────────────────────────────────────┘- Print a 1:1 Physical Proof: Export your layout as a press-ready PDF and print it on an office printer at 100% scale (disable "Scale to Fit Page"). Cut it out and inspect it at true physical size.
- Multi-Device Hardware Testing: Test the printed proof using at least three different smartphones:
- A current-generation premium device (iPhone 14/15/16 or Samsung Galaxy S series).
- An entry-level or mid-range Android phone (which often feature less capable autofocus lenses).
- An older smartphone (e.g., iPhone X or older Android device).
- Lighting and Angle Tests: Hold the proof under direct overhead lighting, in a dimly lit hallway, and at a 30-degree angle. Ensure the camera locks focus within 1 to 2 seconds without requiring extreme manual repositioning.
- Destination URL Check: Confirm that scanning the printed proof redirects to the intended, live landing page and preserves all analytics tracking parameters.
Frequently Asked Questions
Can I print a QR code smaller than 20 mm?
While high-precision commercial presses can cleanly reproduce codes smaller than 20 mm (such as 15 mm), doing so drastically reduces real-world scanning reliability. Small codes demand that users hold their phones exceptionally close (often within 10–15 cm), which frequently triggers lens macro switching or exceeds minimum focal distances on standard smartphone cameras. If space is tight, keep payloads minimal with URL shorteners and test thoroughly.
Does 300 DPI mean my QR code will scan?
No. DPI and PPI measure image resolution (sharpness and absence of pixelation), not optical readability. A 300 PPI QR code will print crisply, but if it is physically too small for the user's distance, lacks a quiet zone, has poor contrast, or encodes a dense 200-character URL, camera sensors will still fail to decode it.
Should I use SVG or PNG for print layouts?
Vector SVG (or EPS/PDF) is always preferred for professional print layouts because it scales infinitely without raster degradation. If your workflow requires raster files, use high-resolution, uncompressed PNG files exported at 300 PPI or higher. Avoid JPEG due to compression artifacts.
Does higher error correction make a printed QR code more reliable?
Not necessarily. While higher error correction (Level Q or H) enables recovery from physical smudges or damage, it achieves this by adding redundant data, which increases the QR code version and module density. At a fixed physical size, this makes every individual module smaller and harder for cameras to resolve. For clean paper collateral, Level L (7%) or Level M (15%) is typically optimal.
Why do some phones fail to scan printed QR codes that work on other phones?
Smartphone cameras vary widely in sensor size, minimum focal distance, lens distortion, and optical image stabilization. Premium phones feature fast phase-detection autofocus and wide dynamic range sensors, whereas budget devices often struggle in low light or close macro ranges. Designing for the conservative baselines detailed in this guide ensures your codes work across all consumer devices.
Final Print-Ready Checklist
Before sending your packaging, stationery, or publication files to the print shop, verify each item on this checklist:
- [ ] Physical Dimension: Handheld items are at least 20–25 mm (0.8–1.0 in); distance signage follows the 10:1 viewing ratio.
- [ ] Resolution: Raster artwork is at least 300 PPI at final reproduction dimensions (
Pixels = [mm / 25.4] × 300). - [ ] Vector Format Used: Generated as SVG or high-resolution PNG (no lossy JPEGs).
- [ ] Quiet Zone Preserved: Minimum 4-module margin of clear space on all four sides.
- [ ] High Contrast: Dark modules on an opaque white or light background (no inverted light-on-dark schemes).
- ] Shortened URL: Payload minimized using a [branded short link to maintain a low module density (Version 1–3).
- [ ] Appropriate Error Correction: Level L or M selected for pristine paper; Level Q/H used only if logo overlays or physical damage are expected.
- [ ] Flat Placement: Positioned away from packaging folds, tight cylinder curves, or heavy gloss laminate glare.
- [ ] Physical Proof Tested: 1:1 scale test print successfully scanned across multiple smartphone models and lighting conditions.
Ready to generate clean, high-resolution QR codes for your next print campaign? Use our free URLShortPilot QR Code Generator to export crisp, customized codes optimized for digital and print media.
Ready to streamline your links?
Create fast, secure short links with real-time analytics, custom domains, and enterprise-grade anti-abuse protections.